5×7 Envelopes on the NEW Envelope Punch Up Board by We R Makers

In today’s video project, I created a 5×7 envelope for a recent card project using the We R Makers Envelope Punch Up Board. All products used in today’s card tutorial project are listed below.
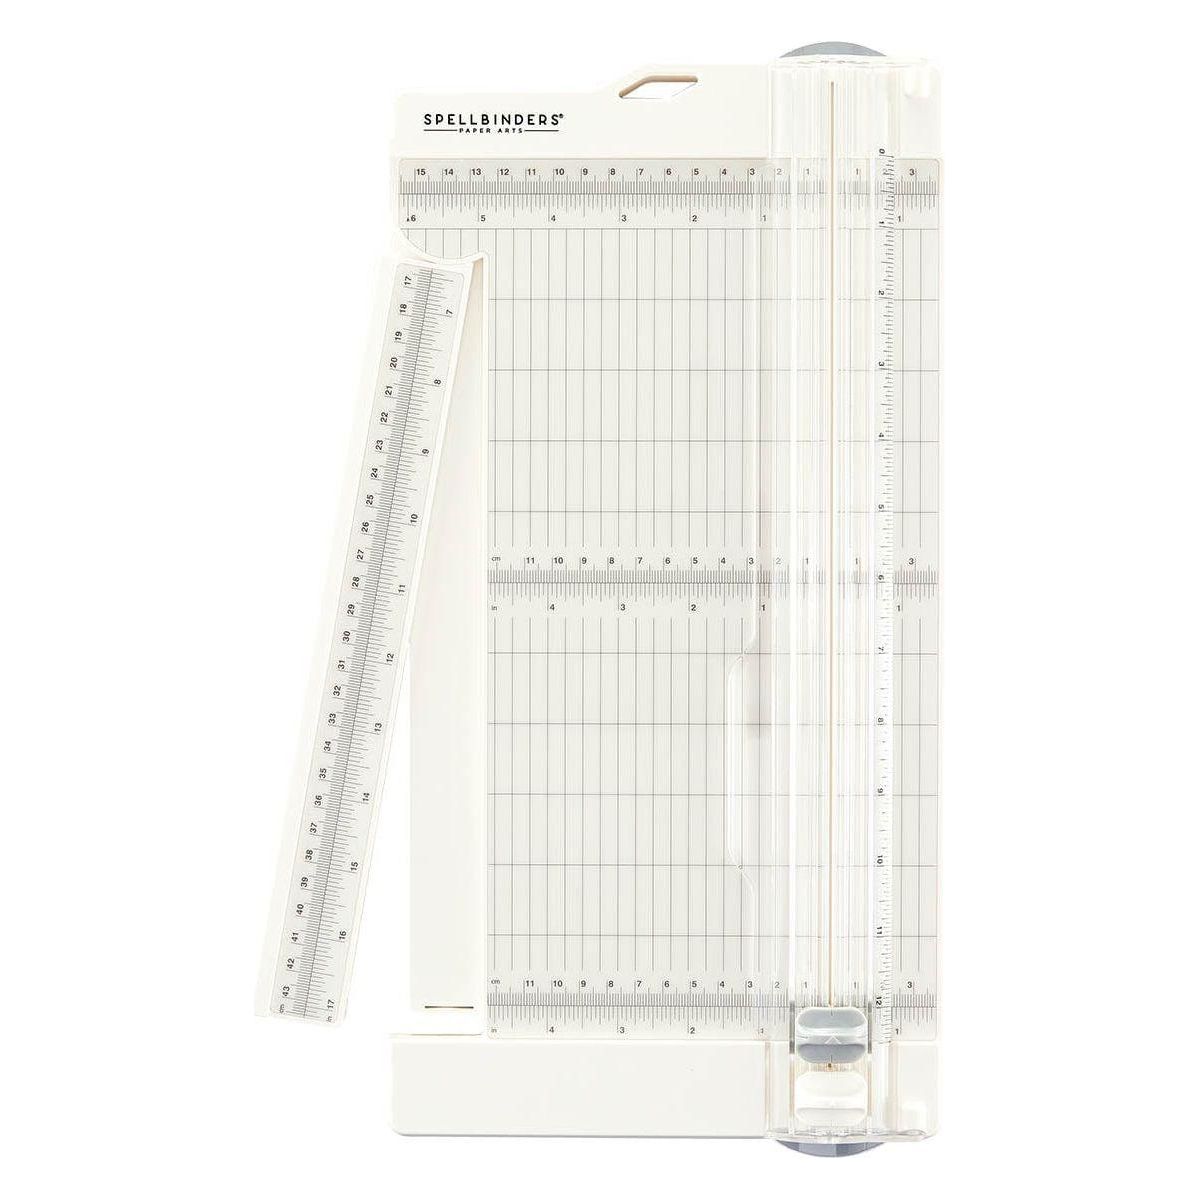
We R Makers Envelope Punch Up Board
I love making and decorating my own envelopes, and usually assemble them with the help of my 1-2-3 Punch Board. There is a bit of a learning curve with this board, and I have many video tutorials in my Punch Board playlist to show how to use it.
When I learned about the new Envelope Punch Up Board, I wanted to test it and see how it compares to the 1-2-3 Punch Board in ease of use, capabilities, and learning curve. I am happy to report that the Envelope Punch Up Board is very easy to use, and you can make any size envelope using the calculator tool. It also makes coordinating envelope liners, and box-style envelopes.

Related Videos:
I created the envelope in today’s video for my SheetLoad of Cards April 2026 project, and have a video and blog post for that card tutorial.

I have an Intro Video for the Envelope Punch Up Board where I show how to make A2 envelopes and envelope liners. I won’t be making a liner for the envelope in today’s video to save on postage. Please check out this video and blog post to learn how to make them easily.

How to Use Envelope Punch Up Board Calculator
The We R Makers Envelope Punch Up Board is very easy to use! The board has a QR code on it that you can scan with your phone, and it will take you directly to the online calculator. You can also find the calculator at the American Crafts website, under the Envelope Punch Up Board product page.
On the calculator, you will see on the top right a toggle switch for inches to centimeters. Then you will see a visual representation of what the card looks like inside the envelope before assembly. There are markings on the illustration as to what size card the envelope is for.

Directly under the diagram, there are three calculations: paper size, start number, and liner size. These are the numbers you need to construct the envelope and the liner.
Below that, there are three sliders where you can enter the length and width of the card, and how much padding you want inside the envelope. As you change the values on the sliders, the envelope and card diagram will change. You can confirm you have the correct measurements entered by looking to the right of the slider, or on the picture.
In playing around with the Punch Up Board, I found that a padding figure of 1/8″ worked very well, even for cards with many layers. If you have a very thick card, you can increase the padding amount so the card will fit into the envelope more comfortably.
5×7 Envelope
Measurements:
5x7" Card
Square Paper: 9 3/4"
Start at 48
Liner Paper: 5 3/8"
Padding: 1/8"
I cut the envelope square from Crafter’s Companion Everyday Brights cardstock, in a color that matched the card project. I used the process below to punch and score the envelope, and then assembled the envelope.
How to Use Envelope Punch Up Board
Once you enter all of the values in the calculator, the bubbles above the sliders will give you the correct measurements to create the envelope. In the 5×7″ envelope example above, the paper should be 9 3/4″ square, start line is 48, and the liner square should be 5 3/8″. I will not be making a liner today, but check out the link above under the “Related Videos’ to see how make one.
To create this envelope, you would first cut a piece of cardstock to 9 3/4″ square. Take the cardstock square piece for the envelope, and place it on a diagonal under the clear plastic guide with the numbers on it. If it is difficult to get under the guide, you can press the clear lever up towards the circle punch to get the guide to lift up a bit.
**TIP: It is very important when scoring and punching that the top edge rests tightly against the diagonal shelf at the top of the board.**
Once the paper is under the guide and lined up against the diagonal shelf at the top, slide the paper up and to the right, or down and to the left to line up the bottom edge of the paper with the correct starting number. In this example, that would be 48. Once that is lined up properly, you would press the circle punch button on the top, and then run the scoring tool down the track. This is right next to the clear guide.
After that, turn the square counterclockwise one turn and slide it under the clear guide again. Make sure the top of the paper is tight against the top diagonal shelf, and slide the paper left or right so the vertical part of the notch lines up with the solid line on the board. Push the circle punch, and then draw the new score line. Repeat the same procedure for the remaining sides.
Once all the steps are complete, you can use the corner rounder on the back of the circle punch if you would like rounded envelope flaps.
➡️I would highly encourage you to watch the video for more information on using the Envelope Punch Up Board. It makes more sense seeing it than reading it, I think.
Here are some generic pictures of the process for using the board.


Envelope Assembly
Once the panels have been cut and scored, it is time to assemble! First, I like to score all of the score lines with a bone folder.

After that, I use 3/8″ double-sided adhesive tape on the bottom flaps, and 1/4″ tape on the top flap. See video for adhesive placement tips and tricks.
Envelope Tutorial Video
Check out the tutorial video here:
If you are looking for ways to decorate your envelopes, check out my Part 1 and Part 2 videos. They offer numerous easy ways to add fun details to your envelopes.
If you are looking for ways to decorate the inside of your cards, check out my Part 1 and Part 2 videos with more easy ideas. I also have a Card-Making Tutorial playlist if you are looking for some crafty inspiration!
Product Links
Here are the products I used to create today’s project. Please consider shopping through my affiliate links, as it greatly helps out my channel at no extra cost to you. Thanks so much for supporting me and my channel!
**Use code EGIDESIGNS for 15% your order at Glassboard Studio**
|